
How to show and customise the item count on the wishlist badge
Show the item count on the wishlist badge
You can display a small count bubble on the wishlist badge so shoppers can quickly see how many items they have saved.
In the app embed settings, this option appears as Show item count on the wishlist badge. When enabled, the app displays a count bubble showing the total number of wishlisted items.
In Shopify, open your theme editor, go to the app embed section, and expand Wysh. Then open the Header/floating wishlist badge settings.
Enable the Show item count on the wishlist badge toggle.
Use the count badge settings to control the badge position, size, font, width, border, and colours.
Check the badge on your storefront to make sure the count is readable and positioned correctly on both desktop and mobile.
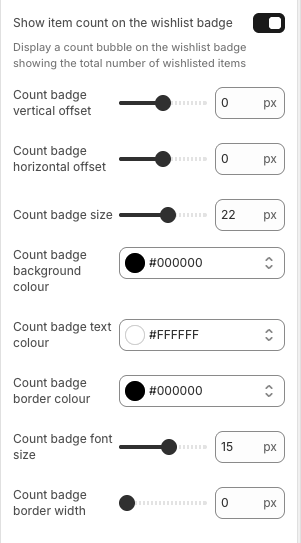
Move the count badge into place
Once the item count is enabled, you can fine-tune where the count bubble sits on the wishlist badge using the offset controls.
Count badge vertical offset
Use Count badge vertical offset to move the count bubble up or down. This is useful if the bubble sits too high, too low, or feels too detached from the wishlist icon.
- Lower values keep the bubble closer to its default position.
- Higher or lower adjustments can help it sit more neatly against the badge, depending on your layout.
Count badge horizontal offset
Use Count badge horizontal offset to move the count bubble left or right. Adjust this if the badge feels too close to the edge of the icon or if it overlaps another part of the badge design.
Change the count badge size and text styling
The app includes separate controls for the size of the bubble and the text inside it, so you can balance visibility with the overall badge design.
Count badge size
Count badge size changes the overall size of the count bubble. Increase this if you want the item count to stand out more, or reduce it if the badge feels too prominent.
Count badge font size
Count badge font size controls the size of the number shown inside the bubble. If the number looks cramped or too small to read, increase the font size until it feels clear without overpowering the badge.
Count badge width
Use Count badge width to control how wide the badge is. This is especially helpful if you want a more rounded pill shape or need more room for larger numbers.
A wider badge can improve readability when shoppers save multiple items.
Count badge border width
Count badge border width controls the thickness of the badge outline. A stronger border can help the count bubble stand out against busy backgrounds or similarly coloured badge icons.
Change the count badge colours
You can customise the item count colours to match your brand and keep the badge easy to read.
Count badge background colour
Count badge background colour sets the fill colour of the count bubble itself. Choose a colour that stands out clearly against the wishlist badge.
Count badge text colour
Count badge text colour changes the colour of the number shown inside the bubble. Use a high-contrast colour so the item count stays readable at a glance.
Count badge border colour
Count badge border colour controls the outline colour around the badge. This can help separate the count bubble from the icon underneath, especially if the background colours are similar.
Recommended styling tips
- Keep the count bubble close to the wishlist badge by starting with the offset controls first.
- Use enough contrast between Count badge background colour and Count badge text colour.
- Increase Count badge width if double-digit counts feel cramped.
- Use Count badge border colour and Count badge border width if the bubble blends into the badge behind it.
- Preview your settings on mobile as well as desktop to make sure the count remains clear and balanced.
What to check after setup
After enabling and styling the count bubble, confirm the following on your storefront:
- The Show item count on the wishlist badge toggle is enabled.
- The count bubble is aligned correctly using Count badge vertical offset and Count badge horizontal offset.
- The bubble is large enough to read with your chosen Count badge size and Count badge font size.
- The selected Count badge width gives the number enough space.
- The colours and border settings make the count stand out clearly against the wishlist badge.
With these settings, you can make the wishlist item count visible, easy to read, and consistent with the rest of your store design.