
Install Wysh on your store
Install Wysh with the setup wizard
Wysh setup is now completed in the setup wizard inside the app. The wizard walks you through choosing a theme, selecting default or custom settings, and enabling Wysh in your theme editor.
This guide explains the new storefront setup flow for Shopify merchants. It focuses on installing Wysh on your online store.
Theme choices made in the setup wizard are app-level settings. Theme editor block settings are theme-level settings. By default, if you set custom styling or placement in the wizard, those wizard settings override styling set through theme blocks.
Before you start
You need access to your Shopify admin.
You need permission to manage apps and edit your online store theme.
Make sure you know which theme you want to install Wysh on. You can choose your live theme or a draft theme in the wizard.
Install Wysh
Install Wysh in Shopify, then open the app from your Shopify admin.
In Wysh, click the button to start the installation wizard.
The wizard shows all themes in your store.
Select the theme where you want Wysh to be installed. You can choose:
Your live theme if you want to set up Wysh on the storefront customers currently see.
A draft theme if you want to test setup before publishing changes.
If you are making design changes first, choose a draft theme so you can review everything before publishing it live.
Next, choose Default settings or Custom settings. You can choose only one option in the wizard.
Default settings
If you choose default settings, Wysh uses:
A default black and white colour scheme
Standard styling
A floating wishlist badge instead of a header icon
Custom settings
If you choose custom settings, you can set:
Icon colours across different areas of the storefront
Whether the wishlist icon is floating or placed in the header
Where the wishlist icon appears on collection pages
Wizard customisation is app-level. Theme editor block settings are theme-level. If you set custom styling or placement in the setup wizard, those wizard settings always override styling set through theme blocks unless you later enable Override Wizard Settings in the embed section.
When the wizard prompts you to embed Wysh, click the button to open your theme editor.
In the theme editor:
Open the App embeds area.
Turn on the Wysh embed.
Save your changes.
This enables Wysh on the theme you selected in the wizard.
Override Wizard Settings
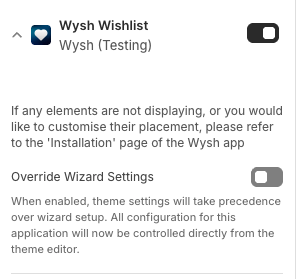
The Wysh embed includes an Override Wizard Settings option.
If this option is enabled, theme settings in the theme editor take precedence over wizard settings. Use this when you want to stop using wizard styling and switch to theme-level settings instead.
Default behavior: wizard settings win over theme block settings. When Override Wizard Settings is enabled: theme editor settings win over wizard settings.
App-level vs theme-level settings
Wysh has two places where styling and placement can be controlled:
Setup wizard: app-level settings that apply from inside Wysh
Theme editor: theme-level settings that apply inside a specific Shopify theme
This matters when you update colours, icon placement, or display options.
Wizard settings apply when you choose custom settings during setup. These are app-level settings and, by default, they override styling or placement set through theme blocks.
Theme editor settings apply at the theme level. If you want those settings to control the storefront instead of the wizard, enable Override Wizard Settings in the Wysh embed.
Use the setup wizard if you want a guided setup with central app settings. Use theme-level settings if you want to control styling directly inside a specific Shopify theme.
Partially supported themes
Some themes are only partially supported. If your theme is partially supported, you still need to use manual placement to finish setup.
Follow the manual placement guide here: Manual theme icon placement.
Even if the wizard is completed, a partially supported theme may still require manual placement so the wishlist icon appears in the right place on your storefront.
Check that Wysh is working
After setup, confirm everything is working on the selected theme:
The Wysh embed is turned on in the theme editor
The wishlist icon appears in the location you expected
Your colours and styling match your chosen wizard or theme settings
Collection page icon placement matches your selected setup options
If you installed Wysh on a draft theme, preview that theme before publishing it live.
Troubleshooting
Check the following:
Make sure you completed the setup wizard in Wysh.
Confirm you selected the correct theme in the wizard.
Open the theme editor and make sure the Wysh app embed is turned on.
Save the theme editor after enabling the embed.
If you are working on a draft theme, preview that draft theme rather than the live theme.
If your theme is partially supported, complete manual placement using Manual theme icon placement.
This usually happens because wizard settings are overriding theme-level settings.
By default, if you chose custom styling or placement in the setup wizard, those wizard settings take precedence over theme block settings.
To use theme editor settings instead:
Open your theme editor.
Open the Wysh embed settings.
Enable Override Wizard Settings.
Save your changes.
After that, theme-level settings should apply instead of the wizard settings.
If your theme is partially supported, the wizard may not place the wishlist icon in the correct location by itself.
You still need to manually place the icon in your theme. Follow the guide here: Manual theme icon placement.
This is expected behavior for partially supported themes.
Related guide
Use this guide if your theme is partially supported and you need to place the Wysh icon manually.